KAU Virtual Film School

System Manual · دليل النظام

The complete guide to every room, tool and role — on desktop, phone and Meta Quest. Updated with each new feature.

الدليل الكامل لكل قاعة وأداة ودور — على سطح المكتب والهاتف ونظارة ميتا كويست. يُحدَّث مع كل ميزة جديدة.

What this platform is

  • A bilingual virtual film school that runs in the browser — no install needed — on desktop, phone, tablet and Meta Quest.
  • Everyone in a class shares one live room: the same environment, lights, cameras, actors, voice and screens.
  • You can also add it to your home screen (Quest, iPhone, Android) and open it like an app.
  • Scene detail is always full; on weaker devices only the resolution adapts so movement stays smooth.

ما هذه المنصّة

  • مدرسة سينما افتراضية ثنائية اللغة تعمل داخل المتصفح — بلا تثبيت — على سطح المكتب والهاتف واللوحي ونظارة ميتا كويست.
  • جميع من في الحصة يشتركون في قاعة حيّة واحدة: نفس البيئة والإضاءة والكاميرات والممثلين والصوت والشاشات.
  • يمكنك أيضًا إضافتها إلى الشاشة الرئيسية (كويست، آيفون، أندرويد) وفتحها كتطبيق.
  • تفاصيل المشهد كاملة دائمًا؛ وعلى الأجهزة الأضعف يتغيّر الوضوح فقط ليبقى الأداء سلسًا.

Accounts and joining

  • Guests join with a name, an email and the class code — enough to practice and be counted present.
  • Sign in with Google or email to save scenes to your account, see your progress and certificate, and use the AI features.
  • Instructors sign in to lead a class, assign roles, author lessons and open the desktop lecture console.

الحساب والانضمام

  • يدخل الضيف باسمه وبريده ورمز الحصة — وهذا يكفي للتدريب وتسجيل الحضور.
  • سجّل الدخول بقوقل أو بالبريد لحفظ المشاهد في حسابك ومتابعة تقدّمك وشهادتك واستخدام مزايا الذكاء الاصطناعي.
  • يسجّل المدرّس الدخول ليقود الحصة ويوزّع الأدوار ويؤلّف الدروس ويفتح لوحة المحاضرة على سطح المكتب.

The rooms

  • Interactive training room — the black hall you build from scratch (environments, objects, people, actions, scene editor).
  • Sound studio — microphones, mixer, EQ, reverb, loops, music beds and voice-over takes, all touchable on the desk itself.
  • Film set, outdoor location, theatre stage and lighting lab — ready sets for framing and lighting practice.
  • Equipment room — walk up to a camera or lens to read its full bilingual specifications.

القاعات

  • قاعة التدريب التفاعلية — الصالة السوداء التي تبنيها من الصفر (بيئات، أغراض، أشخاص، مشاهد، محرّر المشهد).
  • استوديو الصوت — ميكروفونات ومكسر ونغمة وصدى وحلقات وموسيقى وتسجيل تعليق صوتي، وكلها تُلمس على الطاولة نفسها.
  • موقع التصوير والموقع الخارجي وخشبة المسرح ومختبر الإضاءة — مواقع جاهزة للتدريب على التأطير والإضاءة.
  • غرفة المعدات — اقترب من كاميرا أو عدسة لقراءة مواصفاتها الكاملة بالعربية والإنجليزية.

Entering the room

  • Open the site and tap Enter the studio. Type your name and email, then the class code your instructor gave you (or start a solo practice room).
  • Choose Interactive Training Room from the room buttons at the top.
  • Allow the microphone once if you want voice — the page will not keep asking.
  • Signed-in users can save scenes to their account; guests can still build and practice.

الدخول إلى القاعة

  • افتح الموقع واضغط دخول الاستوديو. اكتب اسمك وبريدك ثم رمز الحصة الذي أعطاك إياه المدرّس (أو ابدأ تدريبًا فرديًا).
  • اختر قاعة التدريب التفاعلية من أزرار القاعات في الأعلى.
  • اسمح بالميكروفون مرة واحدة إذا أردت الصوت — لن تتكرر الطلبات.
  • المستخدمون المسجّلون يستطيعون حفظ المشاهد في حسابهم، والضيوف يستطيعون البناء والتدريب.

What you see

  • The room starts as an empty black hall — it is your blank canvas.
  • The Scene Editor button (top bar on desktop, or the headset menu in VR) opens everything you build with.
  • Hide panels any time with the Hide button on each window, or Hide panels / Hide rooms in the top bar to focus on the scene. Only headset view, zoom and voice stay.

ما تراه

  • تبدأ القاعة كصالة سوداء فارغة — إنها لوحتك الفارغة.
  • زر محرّر المشهد (في الشريط العلوي على سطح المكتب، أو قائمة النظارة في الواقع الافتراضي) يفتح كل أدوات البناء.
  • أخفِ اللوحات في أي وقت بزر إخفاء في كل نافذة، أو بزر إخفاء اللوحات / إخفاء القاعات في الأعلى للتركيز على المشهد. يبقى فقط عرض النظارة والتقريب والصوت.

Building the environment

  • Open the Environment tab and tap a ready world: desert, city street, living room, majlis, beach, space station, star flight, or an empty black hall.
  • The whole room changes instantly for you and everyone in the class.
  • Use the Day / Night switch to relight the scene. Lighting is calibrated so shapes stay readable in both.
  • In the Objects tab, tap any item to place it in front of you — furniture, props, walls, trees, vehicles and more. Items snap to a neat quarter-metre grid.
  • Ask the assistant in the Actions box to design something new: type what you imagine and press Enter.
  • The robot assistant now stands in the interactive training hall only — he is the scene builder of that room and no longer appears elsewhere.
  • Tap the robot and simply tell him what you want: "build a rainy night alley" raises the whole set, "start a chase" puts performers on the floor and plays the action, and "empty the hall" clears it. He builds first, then gives one shooting tip.
  • Under the conversation there is a command frame: type an order and press Execute, or press the microphone and say it out loud — what you speak is written in the box and runs when you stop talking.
  • Two brains: GPT for detailed teaching, Fast for quick answers during a busy class. Pick one with the buttons above the command frame.

بناء البيئة

  • افتح تبويب البيئة واضغط عالمًا جاهزًا: صحراء، شارع مدينة، غرفة معيشة، مجلس، شاطئ، محطة فضاء، طيران بين النجوم، أو صالة سوداء فارغة.
  • تتغيّر القاعة كاملة فورًا لك ولجميع الموجودين في الحصة.
  • استخدم مفتاح نهار / ليل لتغيير الإضاءة. الإضاءة مضبوطة لتبقى الأشكال واضحة في الحالتين.
  • في تبويب الأغراض، اضغط أي غرض ليظهر أمامك — أثاث وإكسسوارات وجدران وأشجار ومركبات وغيرها. تترتّب الأغراض على شبكة ربع مترية أنيقة.
  • اطلب من المساعد في خانة الإنشاء تصميم شيء جديد: اكتب ما تتخيّله واضغط Enter.
  • الروبوت المساعد صار يقف في قاعة التدريب التفاعلية فقط — فهو بنّاء المشاهد فيها، ولم يعد يظهر في بقية القاعات.
  • اضغط الروبوت وقل له ما تريد مباشرة: «ابنِ زقاقًا ليليًا ماطرًا» يرفع المشهد كاملًا، «شغّل مطاردة» ينزل الممثلين ويبدأ الحركة، «أفرغ القاعة» يعيدها سوداء. ينفّذ أولًا ثم يعطيك نصيحة تصوير واحدة.
  • تحت المحادثة إطار للأوامر: اكتب الأمر واضغط «نفّذ»، أو اضغط زر الميكروفون وانطق الأمر — يُكتب ما تقوله في الخانة وينفّذ عند انتهائك.
  • عقلان: GPT للشرح المفصّل، و«سريع» للإجابات العاجلة أثناء الحصة. اختر بالأزرار فوق إطار الأوامر.

People and ready-made actions

  • The People tab adds performers — men, women, children — who stand on staging marks.
  • Ready action scenes are now started by the robot, not by a tab: tap him and say "start a fight", "a chase", "a conversation", "a phone call", "a crowd" and so on. The performers appear and act immediately.
  • Asking for another scene switches cleanly — old performers are cleared first.
  • Real classmates who choose the Actor role stand on the leading marks; the remaining figures stay as extras performing automatically.
  • Use Replay to restart the scene exactly as it was.

الأشخاص والمشاهد الجاهزة

  • تبويب الأشخاص يضيف مؤدّين — رجالًا ونساءً وأطفالًا — يقفون على علامات التمثيل.
  • المشاهد الجاهزة صارت تُطلب من الروبوت لا من تبويب: اضغطه وقل «شغّل عراكًا» أو «مطاردة» أو «حوارًا» أو «مكالمة» أو «حشدًا». يظهر المؤدّون ويبدأون فورًا.
  • طلب مشهد آخر يبدّل بسلاسة — يُمسح المؤدّون السابقون أولًا.
  • الزملاء الذين يختارون دور ممثل يقفون على العلامات الرئيسية، وتبقى بقية الشخصيات ككومبارس تؤدي تلقائيًا.
  • استخدم إعادة التشغيل لإعادة المشهد كما كان تمامًا.

Roles in the class

  • Open the class panel and pick your job: actor, camera operator, lighting technician (gaffer), director or script supervisor.
  • The instructor can override anyone's role from the same panel.
  • Actors get a one-tap list of ready actions that starts playing right away.
  • Camera operators practice framing with the cinema cameras; gaffers move and adjust the lights.

الأدوار في الحصة

  • افتح لوحة الحصة واختر عملك: ممثل، مشغّل كاميرا، فني إضاءة، مخرج أو مشرف سيناريو.
  • يستطيع المدرّس تغيير دور أي شخص من اللوحة نفسها.
  • يحصل الممثلون على قائمة مشاهد جاهزة بلمسة واحدة تبدأ فورًا.
  • يتدرّب مشغّلو الكاميرا على التأطير بالكاميرات السينمائية، ويحرّك فنيو الإضاءة المصابيح ويضبطونها.

Moving and grabbing things

  • Desktop: click and drag items, or use the Edit tab to place selected items precisely.
  • VR: squeeze the Grip near an item to pick it up; move your hand and release to drop. Even easier — point your beam at an item across the room (up to about 7 m) and squeeze: it comes to your hand.
  • Lights and the tripod have wide floor rings: grab the ring (it turns orange) and slide them anywhere.
  • To move a light or camera without grabbing, point at its floor ring and squeeze Grip.

تحريك الأغراض والإمساك بها

  • سطح المكتب: انقر واسحب الأغراض، أو استخدم تبويب التحرير لوضع الغرض المحدد بدقة.
  • النظارة: اضغط القبضة قرب الغرض لالتقاطه، حرّك يدك ثم أفلت. والأسهل — وجّه شعاعك نحو غرض بعيد (حتى ٧ أمتار تقريبًا) واضغط: يأتي إلى يدك.
  • للمصابيح والحلقة الأرضية للكاميرا حلقات واسعة: امسك الحلقة (تصبح برتقالية) وحرّكها إلى أي مكان.
  • لتحريك مصباح أو كاميرا دون الإمساك المباشر، وجّه نحو حلقته الأرضية واضغط القبضة.

Camera, recording and sharing

  • Press the red REC button on the cinema camera to start a take — the tally light and the video-assist screen show the live frame.
  • Show my shot broadcasts your camera view to everyone; one shot plays at a time, and the instructor takes priority.
  • Finish solo practice to receive a full report of what you did by email.

الكاميرا والتسجيل والمشاركة

  • اضغط زر REC الأحمر على الكاميرا السينمائية لبدء لقطة — تضيء إشارة التسجيل وشاشة المساعد تعرض الكادر الحي.
  • زر اعرض لقطتي يبث كادر كاميرتك للجميع؛ تعرض لقطة واحدة في كل مرة وللمدرّس الأولوية.
  • عند إنهاء التدريب الفردي يصلك تقرير كامل بما فعلته على بريدك.

Sound desk

  • Open the Sound desk to pick a microphone type (dynamic, condenser, shotgun, lavalier, ribbon) and shape the sound: gain, tone, reverb, tempo and loops.
  • Turn on a beat or room tone to practice recording against it; the headphone monitor lets you hear the processed result.
  • When voice is on, your live microphone joins the same chain so classmates hear the effects too.

طاولة الصوت

  • افتح طاولة الصوت لاختيار نوع الميكروفون (ديناميكي، مكثّف، شوتغان، لافالييه، شريطي) وتشكيل الصوت: الكسب والنبرة والصدى والإيقاع والحلقات.
  • شغّل إيقاعًا أو نغمة غرفة للتدريب على التسجيل معها؛ وسماعة المراقبة تُسمعك النتيجة بعد المعالجة.
  • عند تشغيل الصوت ينضم ميكروفونك الحي إلى السلسلة نفسها فيسمع الزملاء المؤثرات أيضًا.

Saving and loading scenes

  • Signed in? The Saved tab stores the whole scene — environment, objects, people and staging — to your account.
  • Open the Scenes gallery from your dashboard to browse thumbnails, search by name or tag, sort, export a scene file, or open it straight into the hall.
  • Class scenes restore automatically: when students come back, they see the same setup they left.

حفظ المشاهد وتحميلها

  • مسجّل دخولك؟ تبويب المحفوظات يخزّن المشهد كاملًا — البيئة والأغراض والأشخاص والتمثيل — في حسابك.
  • افتح معرض المشاهد من لوحتك لتصفّح المصغّرات والبحث بالاسم أو الوسم والفرز وتصدير ملف المشهد أو فتحه مباشرة في القاعة.
  • مشاهد الحصة تُستعاد تلقائيًا: عند عودة الطلاب يرون نفس التجهيز الذي تركوه.

Full VR control summary

  • Trigger — activate: press buttons, the red REC button, lights and menus.
  • Grip — grab and move: squeeze near an item, or point your beam at a distant item and squeeze.
  • Left stick — walk. Right stick — turn (snap or smooth).
  • A / X — show or hide the menu. B / Y — recenter the view.
  • Point at the floor and release the trigger to teleport.
  • Controller panel: speed, dead zone, fine control, turn style and height.

ملخص تحكم النظارة الكامل

  • الزناد — التفعيل: الأزرار وزر التسجيل الأحمر والمصابيح والقوائم.
  • القبضة — الإمساك والتحريك: اضغط قرب الغرض، أو وجّه الشعاع نحو غرض بعيد واضغط.
  • العصا اليسرى — المشي. العصا اليمنى — الدوران (قفزي أو سلس).
  • A / X — إظهار أو إخفاء القائمة. B / Y — إعادة التوسيط.
  • وجّه نحو الأرض وأفلت الزناد للانتقال الفوري.
  • لوحة التحكم: السرعة والمنطقة الميتة ودقة التحكم ونمط الدوران والارتفاع.

Performance tips

  • The scene always keeps full detail; on weaker devices only the resolution lowers automatically.
  • The editor shows a performance meter (FPS, draw calls, triangles) — keep it in the smooth zone on the Quest.
  • Environments load only when you select them, so the headset stays responsive.
  • Install the site to your home screen for a faster, app-like visit.

نصائح الأداء

  • يحافظ المشهد دائمًا على كامل التفاصيل؛ وعلى الأجهزة الأضعف ينخفض الوضوح فقط تلقائيًا.
  • يعرض المحرّر مقياس أداء (الإطارات وعدد الرسمات والمثلثات) — أبقِه في المنطقة السلسة على النظارة.
  • البيئات تُحمَّل فقط عند اختيارها لتبقى النظارة سريعة الاستجابة.
  • ثبّت الموقع على شاشتك الرئيسية لزيارة أسرع كأنه تطبيق.

Recordings: video as MP4, audio as WAV

  • The record button in the top bar captures what you see in the room — available to every participant, not only the camera operator.
  • Clips are recorded as MP4 wherever the browser supports it (it falls back to WebM only on older browsers), and download with the right file name.
  • Voice-over takes in the sound studio download as WAV, so they open in any editing program.
  • Save to my Drive uploads the file to your own Google Drive, in a folder called KAU Virtual Film School. Connect once and it remembers your account.

التسجيلات: الفيديو MP4 والصوت WAV

  • زر التسجيل في الشريط العلوي يسجّل ما تراه في القاعة — متاح لكل مشارك وليس لمشغّل الكاميرا فقط.
  • تُسجَّل المقاطع بصيغة MP4 حيثما يدعمها المتصفح (ولا يُستخدم WebM إلا في المتصفحات الأقدم)، وتُحمَّل بالاسم الصحيح.
  • تُحمَّل تسجيلات التعليق الصوتي في استوديو الصوت بصيغة WAV لتُفتح في أي برنامج مونتاج.
  • زر حفظ في درايف يرفع الملف إلى قوقل درايف الخاص بك في مجلد KAU Virtual Film School. اربط الحساب مرة واحدة فقط.

Lessons, quizzes and progress

  • The learning page carries the bilingual curriculum: modules, lessons, narration and references.
  • Quizzes are graded automatically and the feedback also appears inside the headset.
  • Your progress page shows module scores, and a completion certificate is issued once every module is finished.
  • The exposure triangle simulator on the home page lets you feel shutter, ISO and aperture on a real photograph before class.

الدروس والاختبارات والتقدّم

  • صفحة التعلّم تحوي المنهج ثنائي اللغة: وحدات ودروس وسرد ومراجع.
  • تُصحَّح الاختبارات آليًا وتظهر التغذية الراجعة داخل النظارة أيضًا.
  • تعرض صفحة تقدّمك درجات الوحدات، وتُصدر شهادة إتمام بعد إنهائها جميعًا.
  • محاكي مثلث التعريض في الصفحة الرئيسية يجعلك تجرّب السرعة والحساسية وفتحة العدسة على صورة حقيقية قبل الحصة.

For instructors

  • The teaching board adds lessons and quizzes yourself, with automatic grading.
  • The desktop lecture console controls the hall lighting, camera angles and the live view while you teach.
  • Assign or override any student's role, hand over control, and keep one shot on the class screens at a time.
  • Attendance and lecture reports, solo-practice reports and certificates are emailed automatically after each session.

للمدرّس

  • لوحة التدريس تتيح لك إضافة الدروس والاختبارات بنفسك مع تصحيح تلقائي.
  • لوحة المحاضرة على سطح المكتب تتحكم في إضاءة القاعة وزوايا الكاميرات والعرض الحي أثناء الشرح.
  • وزّع أو غيّر دور أي طالب، وسلّم التحكم، وأبقِ لقطة واحدة على شاشات الحصة في كل مرة.
  • تُرسَل تقارير الحضور والمحاضرة وتقارير التدريب الفردي والشهادات بالبريد تلقائيًا بعد كل حصة.

Scene gallery

  • The gallery lists every saved scene with a thumbnail, name, date and tags.
  • Search, sort or filter by tag, then open a scene straight into the training hall, export it as a file, or delete it.
  • Exported .scene.json files can be shared with classmates and imported on any device.
  • Instructors can attach any saved scene to a lesson from the gallery; students then see it on that lesson page and open it in the hall with one tap.

معرض المشاهد

  • يعرض المعرض كل مشهد محفوظ بصورة مصغّرة واسم وتاريخ ووسوم.
  • ابحث أو رتّب أو صفِّ بالوسم، ثم افتح المشهد مباشرة في قاعة التدريب أو صدّره كملف أو احذفه.
  • ملفات .scene.json المصدَّرة يمكن مشاركتها مع الزملاء واستيرادها على أي جهاز.
  • يستطيع المدرّس ربط أي مشهد محفوظ بدرس من المعرض، فيظهر للطلاب في صفحة ذلك الدرس ويفتحونه في القاعة بضغطة.

What costs credits (top-up)

  • Most of the school is free to use: entering the rooms, building environments from the ready sets, adding objects and people, the ready action scenes, the camera, recording, the sound desk, saving and loading scenes, lessons, quizzes, progress and certificates.
  • These features use AI and are billed to the school's Anthropic (Claude) account; image generation and spoken narration use an optional OpenAI account: the tutor robot's answers, building a set from a written description, writing a new action scene from your own words, the AI feedback on a lesson or on a scene you built, image generation and the spoken narration.
  • Every AI feature needs a signed-in account, so credits are never spent by an anonymous visitor.
  • When the balance runs out, those AI features stop with a clear message while everything else keeps working — the owner tops up at console.anthropic.com (Billing) and they work again immediately.
  • Email reports and certificates, the shared classroom, voice, the scene gallery and cloud saves do not consume AI credits.

ما الذي يستهلك الرصيد (التعبئة)

  • معظم المدرسة بلا تكلفة: دخول القاعات، وبناء البيئات من المجموعات الجاهزة، وإضافة الأجسام والأشخاص، والمشاهد الجاهزة، والكاميرا والتسجيل، وطاولة الصوت، وحفظ المشاهد وفتحها، والدروس والاختبارات والتقدّم والشهادات.
  • وهذه المزايا تستخدم الذكاء الاصطناعي وتُحتسب على حساب Anthropic (Claude) الخاص بالمدرسة، أما توليد الصور والسرد الصوتي فيحتاجان حساب OpenAI اختياريًا: إجابات الروبوت المساعد، وبناء مشهد من وصف مكتوب، وكتابة مشهد حركة جديد بكلماتك، وملاحظات الذكاء الاصطناعي على الدرس أو على المشهد الذي بنيته، وتوليد الصور، والسرد الصوتي.
  • كل ميزة ذكاء اصطناعي تتطلّب تسجيل الدخول، حتى لا يُستهلك الرصيد من زائر مجهول.
  • عند نفاد الرصيد تتوقّف هذه المزايا برسالة واضحة بينما يستمر كل شيء آخر — ويقوم المالك بتعبئة الرصيد من console.anthropic.com (Billing) فتعمل فورًا.
  • تقارير البريد والشهادات والقاعة المشتركة والصوت ومعرض المشاهد والحفظ السحابي لا تستهلك رصيد الذكاء الاصطناعي.

If something goes wrong

  • No sound from your microphone: turn on the headphone monitor in the sound desk — it asks for the microphone once and connects it to the desk.
  • A panel runs off the screen: every window has a Hide button and scrolls inside its own frame; the top bar can hide all panels at once.
  • AI features ask you to sign in: they only run for a signed-in account so credits are never spent anonymously.
  • Class feels heavy with many students: keep one shared shot at a time; voice is comfortable up to about twenty students.

إذا واجهت مشكلة

  • لا تسمع صوت ميكروفونك: شغّل سماعة المراقبة في طاولة الصوت — تطلب الميكروفون مرة واحدة وتوصله بالطاولة.
  • لوحة تخرج عن الشاشة: لكل نافذة زر إخفاء وتتمرّر داخل إطارها، والشريط العلوي يخفي كل اللوحات دفعة واحدة.
  • مزايا الذكاء الاصطناعي تطلب تسجيل الدخول: تعمل للحسابات المسجّلة فقط حتى لا تُستهلك الأرصدة مجهولًا.
  • الحصة ثقيلة مع عدد كبير: أبقِ لقطة مشتركة واحدة؛ الصوت مريح حتى نحو عشرين طالبًا.

Lesson by lesson: how to teach it

Each lesson below shows the idea in a picture, the studio tools that build it, and how to check the students understood. Save the scene you build, then attach it to the lesson from the scene gallery — students will find it waiting inside the lesson page.

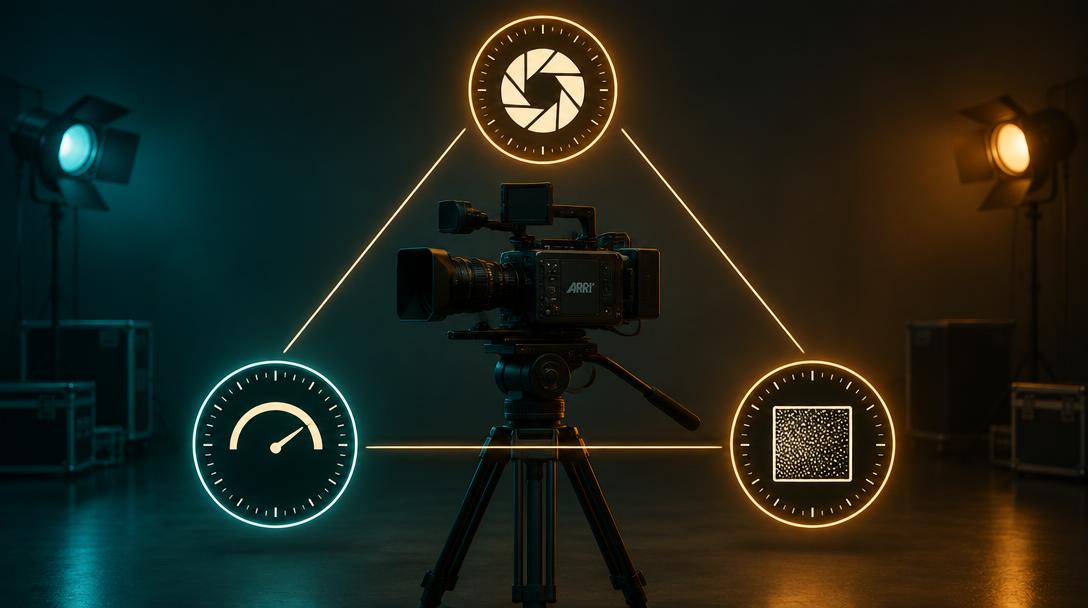
The exposure triangle

The exposure triangle

Students feel how aperture, shutter and ISO trade against each other on one image.

Build it with these tools

  1. Open the interactive training hall and load an empty black hall, then add one actor from the People tab so there is a face to expose.
  2. Add two lights from the Objects tab: one as key at 45°, one soft fill opposite.
  3. Grab a camera and set the shutter to 1/48, then let students change ISO and aperture and watch the video-assist screen.
  4. Save the scene from the Saved tab with a clear name such as 'Exposure — one face, two lights'.

Check understanding: Ask each student to hold the same brightness after changing ISO by one stop.
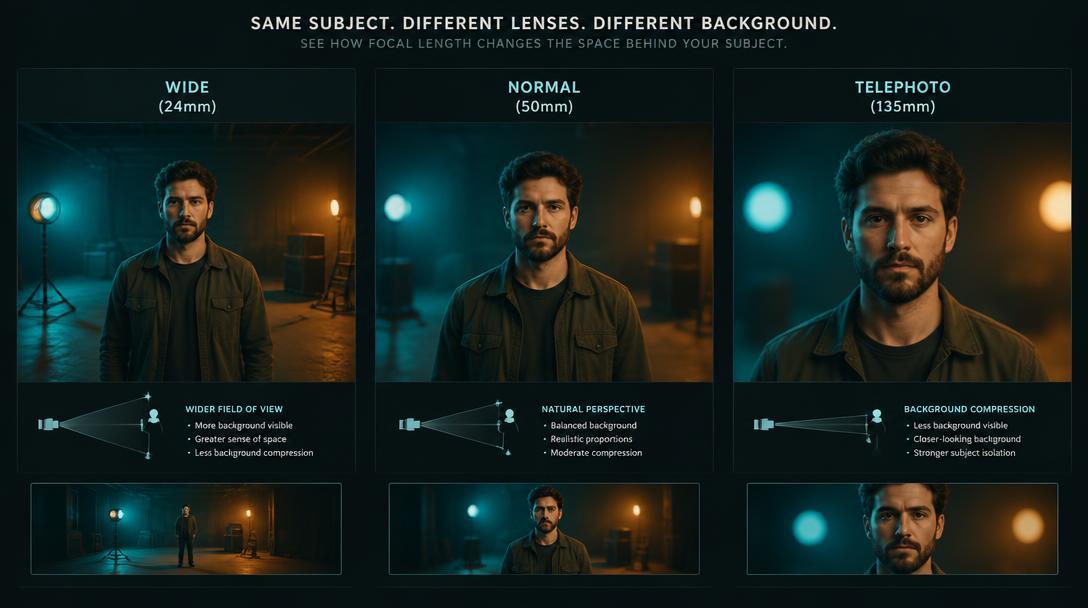
Lens language

Lens language

The same face at 24mm, 50mm and 85mm tells three different stories about the space behind it.

Build it with these tools

  1. Load the city or living-room environment so the background has depth to compress.
  2. Place one actor on a staging mark and keep two objects far behind them as background landmarks.
  3. Use Lens compare in the studio, shooting the same framing at each focal length by walking the camera.
  4. Save the scene and attach it to this lesson so every student starts from identical staging.

Check understanding: The framing must match across the three lenses; only the background may change.

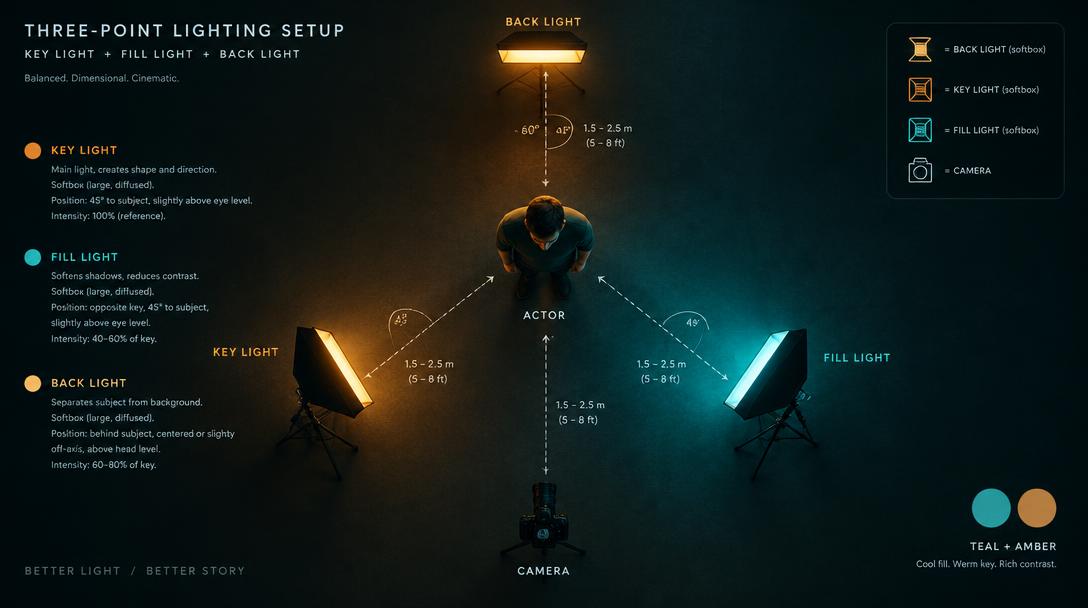
Three-point lighting

Three-point lighting

Key, fill and back light build shape, contrast ratio and separation.

Build it with these tools

  1. Start from the black hall: nothing but floor, one actor and the camera.
  2. Add three lights and use the floor handles to place key, fill and back — point and squeeze in the headset to move them.
  3. Open the light meter and set a 2:1 ratio, then a 4:1 ratio so the class sees the mood change.
  4. Save two versions of the scene (soft and dramatic) and attach the one you want students to open first.

Check understanding: Ask for the ratio by eye before they read the meter.

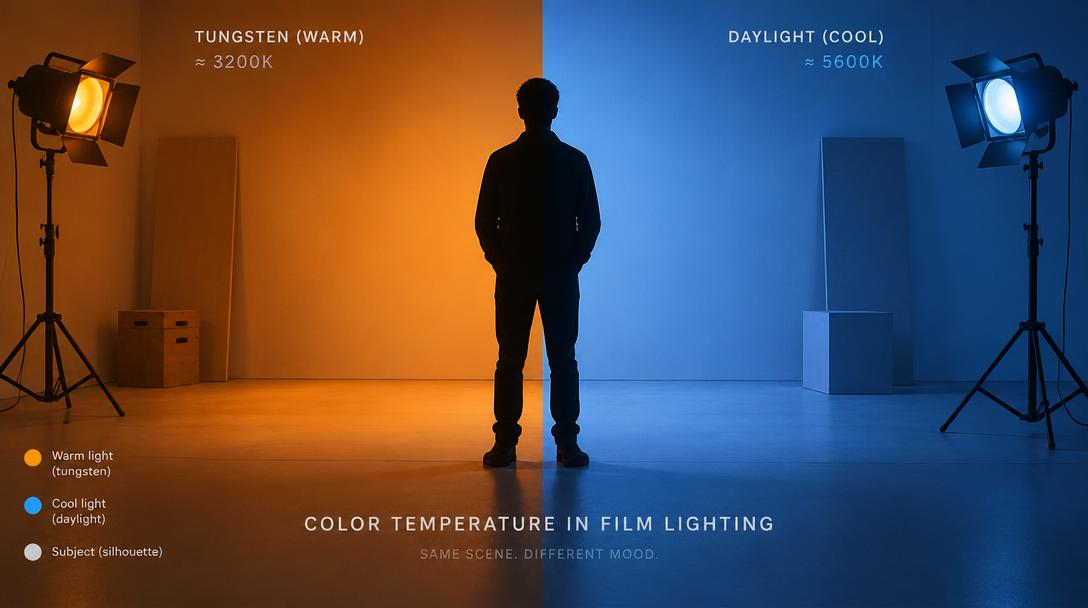
Color temperature and mixed light

Color temperature and mixed light

Warm tungsten against cool daylight, and what white balance does to the mood.

Build it with these tools

  1. Use the outdoor location or the film set, then switch between day and night in the training hall.
  2. Place a warm practical lamp inside the frame and a cool light outside a window or opening.
  3. Let students balance the camera for each source in turn and describe what the other source becomes.
  4. Save the mixed-light setup and attach it to this lesson.

Check understanding: The frame should read natural for one source and coloured for the other — never both neutral.

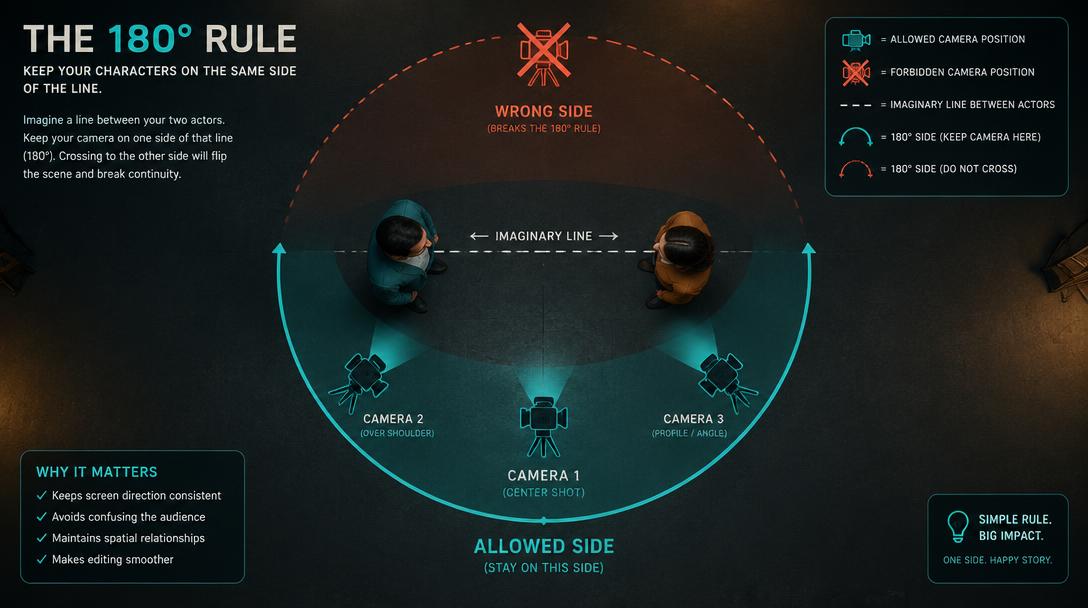
The 180° rule

The 180° rule

Two people, one imaginary line, and consistent screen direction for the audience.

Build it with these tools

  1. From the Actions tab tap the ready 'Conversation' scene — two performers appear on marks and start acting at once.
  2. Ask a student who picked the camera-operator role to shoot from one side, then deliberately cross the line.
  3. Play both takes back with Replay so the class sees the direction flip.
  4. Save the conversation staging and attach it here so students rehearse the same blocking.

Check understanding: Each student must name which shot broke the line and why.

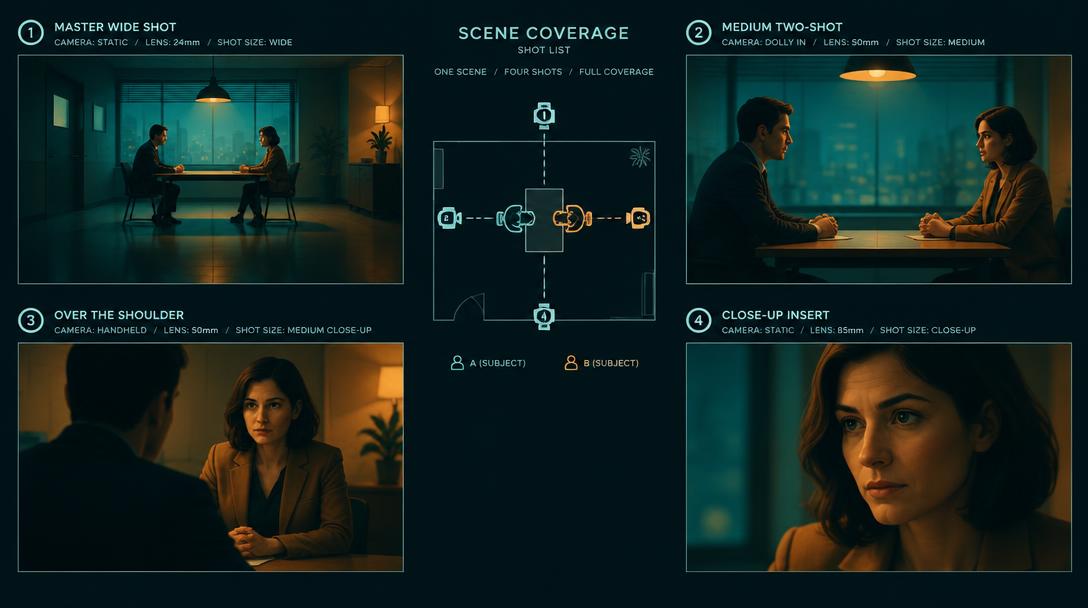
Planning coverage

Planning coverage

One scene, four shots: master, two-shot, over-the-shoulder and insert.

Build it with these tools

  1. Stage a ready action such as 'Seated meeting' or 'Greeting', and cast real students as the actors from the class panel.
  2. Give one student the director role and one the script-supervisor role, then let the camera operator record each take.
  3. Use Show my shot so the whole class watches one shot at a time, and record takes for review.
  4. Save the set and attach it to this lesson; students will find it ready when they open the lesson.

Check understanding: Check the four shots cut together without matching size and angle too closely.

درسًا بدرس: كيف تُدرّسه

كل درس هنا يعرض الفكرة بصورة، والأدوات التي تبنيه في الاستوديو، وكيف تتأكد من فهم الطلاب. احفظ المشهد الذي تبنيه ثم اربطه بالدرس من معرض المشاهد — وسيجده الطلاب جاهزًا داخل صفحة الدرس.

مثلث التعريض

مثلث التعريض

يشعر الطالب كيف تتبادل الفتحة وسرعة الغالق والحساسية التأثير على الصورة نفسها.

ابنِه بهذه الأدوات

  1. افتح قاعة التدريب التفاعلية واختر القاعة السوداء الفارغة، ثم أضف ممثلًا من تبويب «الأشخاص» ليكون هناك وجه للتعريض.
  2. أضف ضوئين من تبويب «الأشياء»: ضوء رئيسي بزاوية 45 درجة، وضوء مالئ ناعم مقابله.
  3. التقط كاميرا واضبط الغالق على 1/48، ثم دع الطلاب يغيّرون الحساسية والفتحة ويراقبون شاشة المتابعة.
  4. احفظ المشهد من تبويب «محفوظ» باسم واضح مثل «التعريض — وجه واحد وضوءان».

تأكد من الفهم: اطلب من كل طالب الحفاظ على السطوع نفسه بعد تغيير الحساسية درجة واحدة.

لغة العدسات

لغة العدسات

الوجه نفسه بـ 24 و50 و85 ملم يروي ثلاث قصص مختلفة عن الفضاء خلفه.

ابنِه بهذه الأدوات

  1. حمّل بيئة المدينة أو غرفة المعيشة ليكون للخلفية عمق يمكن ضغطه.
  2. ضع ممثلًا على علامة وقوف، وأبقِ عنصرين بعيدين خلفه كمعالم للخلفية.
  3. استخدم «مقارنة العدسات» في الاستوديو، وصوّر التأطير نفسه بكل بعد بؤري عبر تحريك الكاميرا.
  4. احفظ المشهد واربطه بهذا الدرس ليبدأ كل الطلاب من نفس التوزيع.

تأكد من الفهم: يجب أن يتطابق التأطير في العدسات الثلاث، والخلفية وحدها هي التي تتغير.

الإضاءة ثلاثية النقاط

الإضاءة ثلاثية النقاط

الضوء الرئيسي والمالئ والخلفي يبنون الشكل ونسبة التباين والفصل عن الخلفية.

ابنِه بهذه الأدوات

  1. ابدأ من القاعة السوداء: أرضية وممثل وكاميرا فقط.
  2. أضف ثلاثة أضواء واستخدم مقابض الأرضية لوضع الرئيسي والمالئ والخلفي — في النظارة وجّه واضغط للإمساك.
  3. افتح مقياس الضوء واضبط نسبة 2:1 ثم 4:1 ليرى الصف تغيّر الإحساس.
  4. احفظ نسختين من المشهد (ناعمة ودرامية) واربط النسخة التي تريد أن يفتحها الطلاب أولًا.

تأكد من الفهم: اسأل عن النسبة بالعين قبل قراءة المقياس.

درجة حرارة اللون والإضاءة المختلطة

درجة حرارة اللون والإضاءة المختلطة

التنجستن الدافئ مقابل ضوء النهار البارد، وأثر توازن الأبيض على الإحساس.

ابنِه بهذه الأدوات

  1. استخدم الموقع الخارجي أو موقع التصوير، ثم بدّل بين النهار والليل في قاعة التدريب.
  2. ضع مصباحًا دافئًا داخل الكادر وضوءًا باردًا خارج نافذة أو فتحة.
  3. دع الطلاب يعايرون الكاميرا على كل مصدر بالتناوب ويصفون ما يحدث للمصدر الآخر.
  4. احفظ إعداد الإضاءة المختلطة واربطه بهذا الدرس.

تأكد من الفهم: يجب أن يبدو الكادر طبيعيًا لمصدر وملوّنًا للآخر — لا محايدًا للاثنين.

قاعدة 180 درجة

قاعدة 180 درجة

شخصان وخط وهمي واحد واتجاه شاشة ثابت للمشاهد.

ابنِه بهذه الأدوات

  1. من تبويب «المشاهد الجاهزة» اضغط مشهد «حوار» — يظهر ممثلان على العلامات ويبدآن الأداء فورًا.
  2. اطلب من طالب اختار دور مشغّل الكاميرا التصوير من جهة واحدة، ثم عبور الخط عمدًا.
  3. أعد تشغيل اللقطتين بزر «إعادة» ليرى الصف انقلاب الاتجاه.
  4. احفظ توزيع مشهد الحوار واربطه هنا ليتمرّن الطلاب على الحركة نفسها.

تأكد من الفهم: على كل طالب تحديد اللقطة التي كسرت الخط ولماذا.

تخطيط التغطية

تخطيط التغطية

مشهد واحد بأربع لقطات: رئيسية، ثنائية، من فوق الكتف، وتفصيلية.

ابنِه بهذه الأدوات

  1. شغّل مشهدًا جاهزًا مثل «اجتماع جالس» أو «تحية»، واختر طلابًا حقيقيين كممثلين من لوحة الصف.
  2. أعطِ طالبًا دور المخرج وآخر دور مشرف السيناريو، ودع مشغّل الكاميرا يسجّل كل لقطة.
  3. استخدم «اعرض لقطتي» ليشاهد الصف لقطة واحدة في كل مرة، وسجّل اللقطات للمراجعة.
  4. احفظ الموقع واربطه بهذا الدرس؛ سيجده الطلاب جاهزًا عند فتح الدرس.

تأكد من الفهم: تأكد أن اللقطات الأربع تتقطّع معًا دون تشابه شديد في الحجم والزاوية.

Enter the Studio